Thursday, October 29, 2009

New arrival!


This is little bundle is a sneak peak into what we have been busy with this week! More on that soon and until then I would like to share this PERFECT Top 10 by Beth at The Stories of A 2 Z. It's soo funny.....because it's true! Although mind you I am well aware I am not yet a "professional" home decor blogger but this is still me to the "T". Enjoy!

Top 10 list for home decor bloggers
Photobucket

Monday, October 26, 2009

Hate your mini blinds?


I was inspired by several bloggers to turn my little girls ugly $3 mini blinds in to Roman Shades. It was either that or invest in the wood blinds (feaux) which would add up to about $50. Umm, this fabric sitting in my storage bench? Free! Free wins in this house. I did have to go buy some fabric glue. This one, Fabritac, cost $4.97.
For a real tutorial click here at Little Green Notebook and check out her blog too! But here you get the idea.


I took off the bottom piece of the blinds, cut the tilt strings (not the lift string!) and took off all but 6 slats. I spaced the remaining slats apart about 9 inches.


I used this glue to glue in the hem of all 4 sides of my piece of fabric, then proceed to glue the fabric to both the top and bottom piece of the blinds, and to all 6 slats.


I trimmed the top with some coordinating ribbon but it doesn't stand out too well. I would love to add black out fabric to the back. I think that would make them look higher quality and keep out more light.

Overall, I am happy with them! They are much cuter than the plastic mini blinds and this project took me about 2 1/2 hours. (I'm not good at measuring). For more pictures of Payton's big girl room click here!

I am submitting this on Kimbas DIY day, thanks for looking and go check it out!


Photobucket

Fall Festivities

Saturday was the perfect day for a Halloween festival. It was sunny, just cool enough, and lots of spooky costumes around. This was Paytons first year actually being able to play the carnival games so Mom and Dad got to wait in line after line! :) It was really fun to watch all the little (and big) ones in their costumes though.


Payton holding Daddies hand


Too cute instead of scary- love it!


Photobucket
Posted by Picasa

Tuesday, October 20, 2009

Kitchen Reveal


So, here it is. The kitchen/ back splash in completion. This did not take at all long to do and I am happy with the results. It is not by any means formal or fancy but it suits us and I like it!

The back splash behind the counters is chalk board paint (what else?) and behind the stove are the wall tiles you can buy from Home Depot. They used to carry these at my Lowes but now seem to be special order only. Scroll to the bottom of post for before picture.


I like the versatility of the chalk board paint. I can write what ever I feel like! I may need to work on my penmenship though.

Added a bare wintery wreath to the kitchen window and a scrolly decal (you can kind of see) above the sink- Hobby Lobby.


Our "breakfast nook" with my head board chalk board and tack board project posted here.


Before picture


I was inspired by Melissa's Procrastinator Party at the Inspired Rooom to finally get this "to-do" off my list! Go check out results of other DIYers while you're at it!

I am aslo posting this for Kimbas DIY day at A Soft Place to Land. Go check it out and thanks for looking!


Photobucket

Monday, October 12, 2009

A sneak peek

I have been working on my kitchen the past week or so and plan on revealing the finish at The Inspired Rooms procrastinator party. In the mean time I wanted to share a couple of small projects I have done.

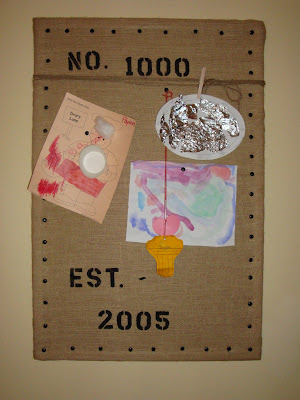
Burlap covered tack board


I have seen other similar projects in blog land and decided to take a combination of things I've seen done and make our own tack board in the kitchen. I much prefer this to papers on the refrigerator!

  • Here's what I used (all from Wal Mart):
  • 1 cork board -$8
  • 1 yard burlap - $2
  • black upholstery tacks from the hardware section $2
  • Black craft paint- .97
  • stencils - $ 1.97 for the pack

I stapled the burlap to the back of the board. It seemed to staple much better on the cardboard middle section. Stuck tacks around wood frame over the burlap. I stenciled our address at the top and year we were married at the bottom. You could put your name, random numbers, I think anything goes! This gives and old grain sack style to it.

For a finishing touch I used $1 twine from Target and tied a around the board. I later found this worked great to hanging a clothes pin to clip more stuff! Cute and functional!

Head Board Chalk Board


You may have seen Kate's foot board project at Centsational Girl. I loved this project and scored this head board/ foot board (?) at my Goodwill for $2.99! It was already painted this cream color and in great shape so all I had to do was spray paint the middle. I taped around the edges and covered the rest with newspaper. Then I sprayed 2 coats of chalk board spray paint! This unique little number is taking the place of my old run of the mill chalk board that was in our kitchen.

If you don't already have a chalk board in your kitchen I would highly recommend it. They are cute and I love to write notes, and lists on it. Also, everyone in our family loves to see a special board on their birthdays and holidays.
I am posting this at Kimba's A Soft Place to Land DIY day. Go check it out and thanks for looking!


Photobucket

Ballard Beautys


OK, so I know we are just getting started with Fall, but have you seen the new Ballard Designs holiday catalog? My heart was SWOONING each page! Seriously, it was getting me excited for the holidays with so many ideas!
Here are a few of my favorites!


Above: These stockings are adorable! I think I can even make something similar to these with burlap. Who can get enough of burlap these days? I'm telling you- ideas are just racing in my head.


These ornaments are too fun. They also pictured them in a decorative bowl just sitting around. Love em!


Pretty wreath....another DIY project in my head!


And I have something like these drapes in the smaller check but don't you just love this plaid? Great for a cozy winter!

Love these Twelve Days of Christmas ornaments. You get all 12 days in the set. I think they would add a great touch of understated elegance to my tree.


Photobucket

Tuesday, October 6, 2009

Procrastinator Party!


It's time for all decorating procrastinators to unite at The Inspired Room and show our projects! This is my kitchen. It's OK but I want to to something with the back splash. So here it is, my "before" picture. Stay tuned to see the after along with everyone else Oct. 20th!

Kitchen before:


Photobucket

Monday, October 5, 2009

Shut-the front-door!


Here is my weekend project. I have to tell you I am in love. Isn't she a beauty?! I wish I would have taken a before picture of my new door but I was in such a frantic exitement that I did not take the time to snap some shots of her "before". I found this lovely at the Habitat Restore a little bit more shabby than she is now for $40!


Before: This is the old front door.

After- still need to work on the frame

After: the wreath shot. My fall wreath is two I had wired together.
A plain greenery behind last years fall wreath, hung by a strip of burlap.

After: Full door shot. I sanded the entire door and stained (both sides) with a can of poly/stain in one I also scored at the Restore!

The handle and lockset was on clearance at Walmart- $25. Entire new (might I say gorgeous) new door for $65 = one happy girl. :)

I am posting this at Kimbas DIY day! Check it out and thanks for looking!

DISCLAIMER: If you have noticed the sticky little decals on the sidelite- I am fully aware these are not chic, however I have a 3 year old and she loves them. Decorate for YOUR family and have fun with it!

Photobucket

Sunday, October 4, 2009

Pumpkin Patch!


Friday we went with our story time group to Lineberger Farms for a hay ride and pumpkin picking! Payton enjoyed all the toys with her friends and did a great job picking out her pumpkin.


On the rotating tire swing


Wow! Look how tall!


Sweet girl :)
We are loving this fall weather. It is perfect right now here in the Carolinas! A sunny, cool 75 degrees, hanging out outside, windows open in the house, cool enough for home made chilli!
Pictures to come soon of my weekend project (I am in love with this!) and Paytons "princess pumpkin".


Photobucket
Posted by Picasa